Coolant leaking from thermostat housing is a common automotive problem that can lead to serious engine damage if left unaddressed. This guide provides a comprehensive overview of identifying the source of the leak, diagnosing the issue, performing repairs, and implementing preventive measures to maintain a healthy coolant system. Understanding the various causes, symptoms, and repair procedures is crucial for effective troubleshooting.
This guide will walk you through the steps involved in identifying the cause of a coolant leak from the thermostat housing, from visual inspection to advanced diagnostics. We will also discuss different repair methods and the importance of proper maintenance to prevent future leaks.
Identifying the Leak Source
Your engine’s coolant, a vital liquid for maintaining optimal temperature, sometimes decides to take a scenic route—out of the thermostat housing. It’s like a tiny, disgruntled rebel, plotting its escape. Understanding why this rebellious coolant is fleeing its designated pathway is key to a swift and satisfying repair. Let’s delve into the mysteries of coolant leakage.
Common Causes of Coolant Leaks from the Thermostat Housing
Coolant leaks from the thermostat housing often stem from issues with seals, gaskets, or the housing itself. Think of it as a poorly constructed dam—a tiny crack or worn seal can lead to a flood of coolant. A worn-out gasket, a cracked housing, or a faulty thermostat can all be culprits in this coolant exodus. The specific culprit will often dictate the type of leak you’ll encounter.
Potential Damage Scenarios to the Thermostat Housing, Coolant leaking from thermostat housing
The thermostat housing, like any mechanical component, can experience various forms of damage. A common culprit is the dreaded “wear and tear.” Over time, the gasket that seals the housing can degrade, leading to coolant leakage. Imagine a poorly maintained rubber band—it loses its elasticity, and so does the gasket. Beyond this, a collision or impact could crack the housing itself, creating a much larger and more persistent leak.
The extent of the damage will affect the severity and type of leak.
Differences Between Coolant Leaks from the Thermostat Housing and Other Engine Components
Coolant leaks from the thermostat housing are often localized, primarily near the base or body of the housing. Leaks from other components, such as the water pump or hoses, may exhibit different patterns and locations. This localization can help pinpoint the source of the leak. Think of it like a detective—a specific location can narrow down the suspects.
Types of Coolant Leaks and Their Relation to the Thermostat Housing
Coolant leaks manifest in various ways, each hinting at a different underlying problem. A slow drip suggests a gradual degradation of a gasket or seal. A spraying leak points to a more significant damage, potentially a crack. A pooling leak usually indicates a more substantial issue and rapid flow of coolant. The type of leak often mirrors the severity of the damage to the thermostat housing.
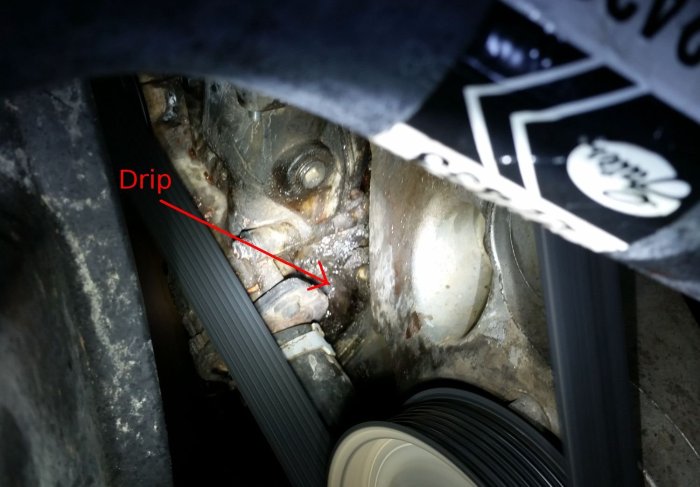
Visual Inspection Process for the Thermostat Housing
A thorough visual inspection is essential for identifying potential damage. Start by examining the base of the thermostat housing for any signs of leakage. Look for any wetness or discoloration, as these can be telltale signs of a coolant leak. A careful examination will reveal if the leak is from the gasket, the housing, or another component.
Pay close attention to the surrounding area for any evidence of coolant pooling or dripping.
Leaks from the thermostat housing can be a real headache, potentially costing you a fortune. Understanding your vehicle’s warranty and insurance coverage, like what .com aida rios connect insurance offers, is crucial. Addressing coolant leaks promptly is essential, as they can lead to overheating issues and significant engine damage if ignored.
Comparison Table of Potential Causes and Symptoms
| Potential Cause | Symptoms | Location | Severity |
|---|---|---|---|
| Worn gasket | Dripping coolant near the base of the housing | Base of housing | Moderate |
| Cracked housing | Dripping/Spraying coolant | Housing body | Variable |
A table like this can be extremely useful for troubleshooting your coolant leaks.
Diagnosing the Problem
Ah, the dreaded coolant leak. It’s like a tiny, insidious villain plotting to turn your engine into a bubbling, hissing disaster. But fear not, intrepid mechanic! We’re about to unleash the power of diagnosis, turning that leak into a clear, manageable problem.This section details the crucial steps to pinpoint the culprit, ensuring you’re not chasing ghosts in your engine bay.
From checking fluid levels to performing pressure tests, we’ll arm you with the knowledge to identify the precise location of the leak, like a detective tracking down a mischievous mole.
Checking Coolant Level and Pressure
To begin, you’ll need to ensure your coolant levels are within the proper range. A low coolant level can lead to overheating issues, making the engine behave erratically, but not a leak. Carefully check the reservoir, ensuring the level aligns with the markings. If it’s low, top it off with the correct coolant type, taking care not to overfill.
Next, the system pressure needs evaluation. This is where a pressure gauge comes in handy. It tells you how much pressure the coolant is under, giving clues to potential leaks. An abnormally low pressure suggests a leak somewhere in the system.
Using a Pressure Test to Pinpoint the Leak
A pressure test is your secret weapon for leak detection. It simulates the normal operating pressure within the cooling system, making hidden leaks manifest. Connect the pressure gauge to the appropriate fitting on the radiator cap. Slowly increase the pressure, monitoring the gauge and listening for any hissing sounds. These sounds pinpoint the exact location of the leak.
If the pressure drops quickly, you’ve got a major leak. If it’s gradual, the leak is likely smaller.
Disassembling the Thermostat Housing
Now, for the more hands-on part – disassembling the thermostat housing. Safety first! Ensure the engine is completely cool. Carefully remove any necessary components like hoses and clamps. Disconnect the thermostat housing from the rest of the system. Thoroughly inspect the housing, looking for any cracks, corroded areas, or obvious leaks.
A good inspection tool is a flashlight with a magnifying glass.
Comparing Diagnostic Tools
| Tool | Use | Advantages | Disadvantages |
|---|---|---|---|
| Pressure gauge | Measures system pressure, pinpoints leaks | Precise leak detection, helps isolate problems | Requires specialized knowledge, potentially costly |
| Leak detector | Identifies leaks | Quick detection, can be used in hard-to-reach areas | May not pinpoint exact location, relies on detecting fluids |
Different leak detection methods offer varying degrees of accuracy. A pressure test is the gold standard, offering precise location identification. Leak detectors are helpful for quickly identifying leaks, but they might not always pinpoint the exact source. A combination of these methods can provide a more thorough diagnosis.
Repairing the Leak
Fixing a coolant leak from the thermostat housing is like being a detective, but instead of searching for clues, you’re searching for a tiny crack or a loose gasket. It’s a bit of a messy job, but with the right tools and a little patience, you’ll have your engine purring like a contented kitten in no time.This section delves into the practical steps for replacing a faulty thermostat, ensuring proper coolant system maintenance, and sealing any cracks in the thermostat housing.
We’ll also cover the essential parts you’ll need, providing a clear roadmap for a successful repair.
Replacing a Faulty Thermostat
Replacing a faulty thermostat is a straightforward process. First, you’ll need to locate the thermostat housing, which is often situated near the engine’s front or side. Disconnect the coolant hoses from the housing and drain the coolant into a suitable container. Carefully remove the old thermostat housing and carefully inspect it for any damage. Then, carefully install the new thermostat and housing gasket.
Reassemble the system, ensuring all connections are tight. Refilling the coolant system is crucial for optimal engine performance.
Coolant System Flushing and Refilling
Proper coolant system flushing is vital for removing old, contaminated coolant that can lead to corrosion and other problems. Use a suitable coolant flush solution, following the manufacturer’s instructions. After flushing, thoroughly rinse the system with fresh water to ensure all traces of the old coolant are gone. Fill the system with the correct type of coolant, specified by your vehicle’s manual.
Overfilling can be as detrimental as underfilling. Check the coolant level regularly after the engine has warmed up.
Installing a New Thermostat Housing Gasket
A new thermostat housing gasket is essential for a leak-free system. Carefully clean the surfaces where the gasket will be placed to ensure a proper seal. Position the gasket correctly, making sure it’s not warped or damaged. Install the thermostat housing, ensuring the gasket is compressed evenly. Overtightening can damage the housing, so torque it to the recommended specifications in your vehicle’s manual.
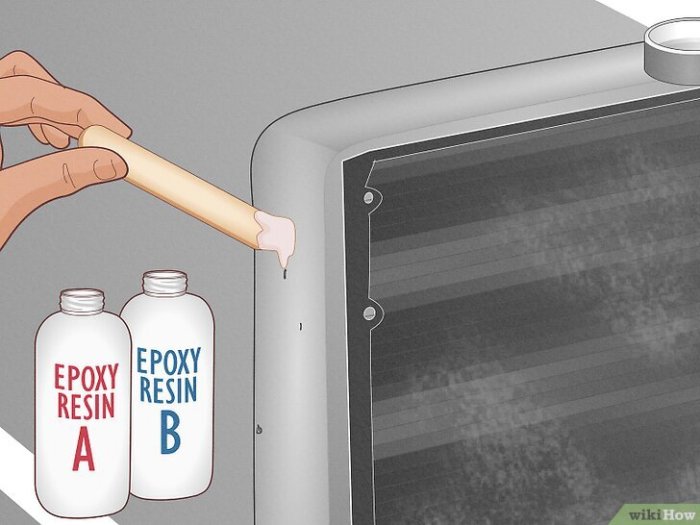
Sealing a Cracked Thermostat Housing
If your thermostat housing is cracked, sealing it is an option before replacing it. Apply a high-quality sealant designed for engine coolant systems to the crack. Make sure the sealant completely covers the crack, ensuring no gaps. A high-temp silicone sealant is a reliable choice for this. Check the sealant’s curing time and allow it to dry completely before reassembling the coolant system.
Replacement Parts
This table Artikels the necessary parts for the repair.
| Part | Description | Quantity |
|---|---|---|
| Thermostat | Regulates engine temperature | 1 |
| Housing gasket | Seals housing | 1 |
| Coolant | Engine coolant | As needed |
Reassembling the Thermostat Housing
Carefully reconnect the coolant hoses to the thermostat housing, ensuring a tight seal. Check all connections for leaks before reassembling the coolant system. Once all components are securely fastened, fill the coolant system with the correct type of coolant, checking the level periodically. Start the engine and monitor for any leaks.
Prevention and Maintenance
So, you’ve vanquished the coolant leak from your thermostat housing. Fantastic! But conquering a leak is only half the battle. The real hero is prevention. Think of it like this: a leaky faucet is a nuisance, but a leaky car? That’s a whole different level of headache.
Let’s get proactive and avoid future coolant calamities.Regular maintenance is your secret weapon against a myriad of automotive woes. It’s like a good doctor’s visit—catching problems early is far better than facing a full-blown crisis down the road.
Coolant Level Checks
Keeping an eye on your coolant levels is crucial. Low coolant levels can lead to overheating, which can wreak havoc on your engine. Think of your engine as a delicate engine room—you need the proper amount of coolant to keep things running smoothly. Check your coolant levels at least monthly. A simple visual inspection should do the trick.
If you see a low level, top it off with the correct coolant mixture.
System Pressure Checks
Annual pressure tests are vital. These tests can pinpoint hidden leaks that might be too small to notice visually. Think of it like an internal security check for your engine. Pressure tests identify these tiny leaks that can silently cause trouble later. If you hear a hissing sound or notice a drop in pressure, it’s time to call in the professionals to diagnose the problem.
Thermostat Inspection
A thorough inspection of your thermostat is recommended annually. A faulty thermostat can lead to fluctuating engine temperatures, which can impact fuel efficiency and engine life. Check for any signs of damage, such as cracks or warping. A properly functioning thermostat ensures your engine runs at the optimal temperature.
Coolant Type Importance
Using the correct type of coolant is paramount. Different coolants have varying chemical compositions and temperature tolerances. Using the wrong type can compromise the coolant’s ability to effectively cool your engine, leading to overheating and potential damage. Your car’s owner’s manual will specify the correct type of coolant to use. Remember, using the wrong type of coolant is like using the wrong type of oil—it can severely harm your engine.
Preventative Maintenance Schedule
| Task
So, coolant leaking from the thermostat housing, huh? It’s a common problem, often indicative of a deeper issue. You might find yourself craving a tasty slice from Tony’s Pizza Haymarket Virginia tony’s pizza haymarket virginia , but a leaky thermostat could quickly dampen your appetite. Ultimately, addressing the coolant leak is crucial for maintaining optimal engine performance.
| Frequency | Description ||—|—|—|| Coolant level check | Monthly | Visually inspect coolant levels and top off as needed. || System pressure check | Annually | Employ a pressure test to detect leaks, even minuscule ones. || Thermostat inspection | Annually | Inspect the thermostat for signs of damage, cracks, or warping. || Coolant Flush and Replacement | Every 3 years | Flushing your coolant removes contaminants that can lead to corrosion.
|
Troubleshooting Common Issues
So, you’ve tackled the thermostat housing leak, pat yourself on the back (or maybe just your shoulder; we won’t judge). But that persistent drip, drip, drip? It’s like a mischievous gremlin, determined to ruin your weekend. Let’s delve into the common culprits behind those pesky coolant leaks that just won’t quit.
Possible Causes for Persistent Leaks
Sometimes, a seemingly straightforward repair isn’t the whole story. There might be hidden culprits, like a poorly tightened bolt or a piece of debris that’s wreaking havoc. Or maybe the culprit is a bit more subtle, like a gradual weakening of a hose or a connection that’s just plain tired. The key is methodical diagnosis, and that’s where we come in.
Potential Issues with Coolant System Hoses or Connections
Coolant hoses, like old socks, can stretch and weaken over time. Think of them as aging rubber bands – they lose their elasticity and can develop tiny cracks. These tiny cracks can grow into full-blown leaks, and you’ll be adding coolant more frequently than you’d like. Similarly, connections can loosen, causing a slow but steady drip. It’s like a leaky faucet, but with the added drama of overheating engines.
Leaks Originating from Surrounding Engine Components
Engine components are like a family of interconnected parts, and sometimes, a problem in one area can affect another. A cracked cylinder head, for example, can leak coolant, and that leak could easily be misidentified. Or maybe a faulty gasket is to blame. These issues often require more specialized tools and sometimes, a little bit of a “detective” mentality to pinpoint the root cause.
Scenarios Where Coolant Leaks Reappear
Coolant leaks, like bad habits, can be sneaky. They might reappear after a few weeks, months, or even years. The culprit could be a simple installation error that wasn’t caught during the initial repair. Perhaps the new hose wasn’t properly secured or a connection wasn’t tightened enough. Or, a tiny crack in a component, unnoticed at first, can slowly grow and cause a leak over time.
Troubleshooting Steps and Solutions
| Issue | Potential Cause | Solution |
|---|---|---|
| Leak reappears | Incorrect installation, overlooked debris | Re-inspect installation, remove debris |
| Leak around hoses | Worn hoses, damaged connections | Replace hoses, tighten connections, check for cracks |
| Leak from engine components | Cracked cylinder head, faulty gasket | Consult a mechanic, professional diagnosis |
Inspecting hoses and connections is crucial. Feel each hose for any bulges, cracks, or signs of weakening. Check the connections for any looseness or signs of corrosion. A good flashlight and a keen eye are your best friends in this detective work. Remember, a little bit of preventative maintenance goes a long way in preventing these issues in the first place.
Don’t be afraid to ask for help from a mechanic if you’re unsure. They’re the experts, and they can help you find the root of the problem.
Last Point
In conclusion, coolant leaks from the thermostat housing, while potentially problematic, are often manageable with proper identification, diagnosis, and repair. By following the steps Artikeld in this guide, you can effectively address these leaks, ensuring the longevity and optimal performance of your vehicle’s cooling system. Regular maintenance and preventative measures are key to avoiding costly repairs and potential engine damage down the line.
Popular Questions: Coolant Leaking From Thermostat Housing
What are the most common causes of coolant leaks from the thermostat housing?
Worn gaskets, cracked or damaged thermostat housings, and loose connections are among the most common causes. A detailed visual inspection and pressure test can often pinpoint the specific source of the leak.
How can I visually inspect the thermostat housing for signs of damage?
Carefully examine the thermostat housing for any cracks, leaks, or signs of wear. Look for dripping, pooling, or spraying coolant around the base or body of the housing. A comparison table within the guide illustrates the different potential causes and associated symptoms.
What tools are necessary for diagnosing a coolant leak from the thermostat housing?
A pressure gauge is valuable for accurately measuring system pressure and pinpointing the leak location. A leak detector can quickly identify leaks but may not pinpoint the exact source. The guide also presents a table comparing different diagnostic tools and their respective advantages and disadvantages.
What are the potential issues with coolant system hoses or connections?
Worn or damaged hoses and connections can lead to leaks around the thermostat housing. Regular inspection of these components is crucial, as identified in the troubleshooting section. Replacing worn hoses is a straightforward repair.
